There were many reasons to purchase a color CCD camera after having more than four monochromatic cameras dedicated for astrophotography. Some of them were: shooting comets, shooting constellations, shooting broadband color images (reflection or dark nebulae) under limited weather conditions (with mono CCD I many times ended with having just red and green data, but missing blue or having lot more green data then red or vice versa or simply missing some color channel). Also, I wanted to avoid some DSLR issues (that even those nice, cooled DSLRs from e.g. centralds.net have, like various banding in images due to fast readout, eternal bayonet flexure etc.) and being used to CCDs (producing FITs files) and considering that QHY is in business already for many years (so I thought the QC would be a bit better than “standard Chinese product quality”) I gave it a try and purchased an OSC CCD, QHY10.
As I still believe, I get the time to sit down and write a comprehensive user report on QHY10, I stick, for now, with just first impression and test that I performed with new QHY camera and that surprised me so much (I couldn’t believe it’s typical behavior of QHY cameras as I have never ever seen something so unbelievable before and already thought that my camera is faulty).
It is, time it takes for the camera to settle on set-point cooling temperature. Normally, all cameras I have owned before (Atik, Moravian Instruments) or cameras of my friends (SBIG, FLI) work the way that you set the cooling temperature, turn cooling ON and within some fixed/linear amount of time (sometimes you can also set the delta drop per minute in degrees of Celsius – Moravian cameras) the camera reaches the desired temperature without any overshoots and with 0.1 degrees precision.
It surprised me that this is different with QHY and normal, expected behavior! Not only that the power/regulating unit DC-201 uses thick, hard to bend in freezing temperatures, pretty short, non standard cables that flex in the unit even when 2.1mm DC socket (as recommended in the user’s manual) is used. It happened to me couple of times that the cooling stopped to work for no reason (during initially working session) or that my laptop froze on drivers. So there are still many drawbacks that definitively put me off on recommending QHY cameras to anyone. I will list more facts and solutions/workarounds when I gain more experience with my new camera. I am sure that not many users are so picky like I am and I guess that many QHY camera users are new-comers, beginners who purchase QHY as their first cooled CCD camera and therefore do not complain about such details like I do.
Let’s go to the cooling results. One of my wish was to use QHY10 for shooting constellations with wide field lens when I go on vacation (once per year) to some light-pollution free location. This means I need as small and lightweight travel imaging package as possible which also means I am power limited. As the camera has SONY CCD sensor (my favorite brand) I know I am OK when the chip temperature is just slightly below zero degrees (based on my previous large experience on testing/measuring various CCD cameras), say minus 5 degrees of Celsius in order to save the battery pack power as much as I can.
Following charts show the change of the temperature (red line) and TEC cooling power (blue line) over time after turning cooling ON, based that the camera initial temperature is ambient. The first chart was taken in MaxIm DL with QHY ASCOM driver, the second and third (to make sure the data I have measured could be trusted) were taken in EZCAP with native QHY driver.
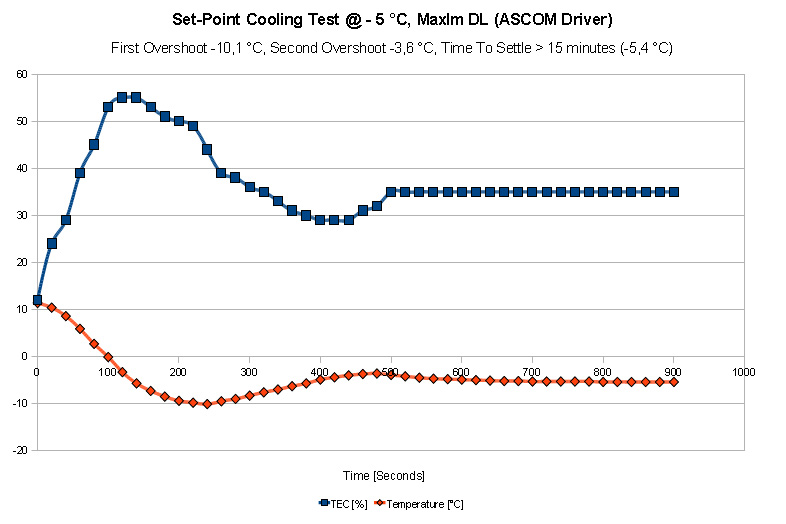
QHY10 Cooling Test MaxIm DL, ASCOM driver

QHY10 Cooling Test EZCAP, native driver

QHY10 Cooling Test EZCAP, native driver
The major surprise is that if you want to cool down to -5°C the camera reaches less than -10°C in about 4-5 minutes, then after another 4-5 minutes it overshoots again to about -3°C and after another 4-5 minutes it finally settles on the desired set-point temperature. This is pretty ugly, but it is just the way it is. It’s fact. So you need to keep this in mind and turn cooling ON at least 10 minutes before you want to start your imaging session. I know I am picky, but I simply want quality for the money we all spend on this expensive hobby.
Last chart shows maximum TEC cooling and power usage. It perfectly confirms what manufacturer claims – it uses about 13 Watts when TEC power is on 50%. The maximal temperature drop from ambient was about 40°C in my laboratory (stable) environment (using 4Amp 12V regulated power supply).
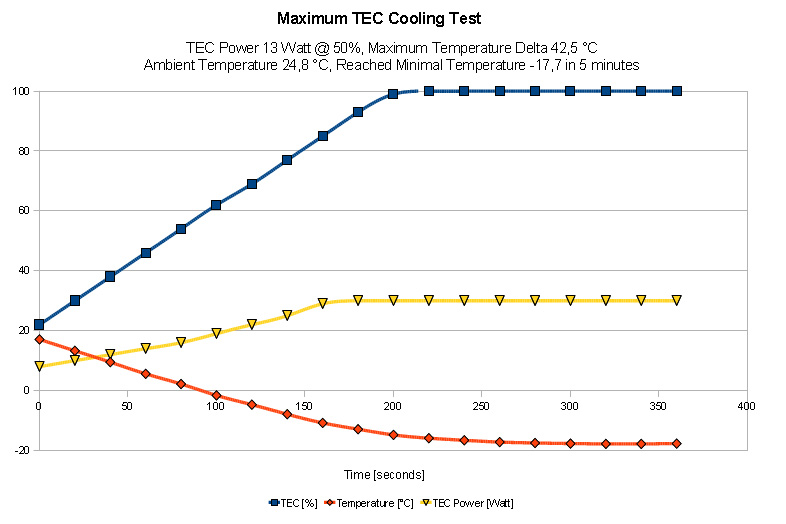
QHY10 Maximum TEC Cooling Test
References
QHY CCD Astronomy
Cooled DSLR